Cheap Lighting
 I love to shoot birds and landscapes, but sometimes it's nice to work in a controlled lighting situation. It can be tedious to set up the subject and lights (lots of furniture to move around in my case), but very rewarding once you see what good lighting will do. Unfortunately, I can't afford a good set of studio lights yet :( so I improvise. The picture of the vases shown here was shot with compact flourescents and worklight reflectors I bought at Lowe's (next to my workplace at the time). I also don't have any light stands, so I made a few stick in a cans which I learned about from the prophotolife videos on youtube. So if you have the patience, you can shoot an everyday object and make a stunning image (these are just souvenirs from a long ago trip to Greece). Just keep in mind a few things:
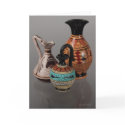
 - Set the white balance manually. These bulbs all have listed color temperatures, but I keep seeing a nasty greenish tint. Setting the color balance will correct this.
- Experiment with multiple bulb "temperatures". I lit the above scene and with a colder (higher K) bulb which I used as the white setting, then used a warmer bulb against the back wall to get the red-orange backdrop.
- Be careful with reflective surfaces. Make sure you're not reflecting the camera, a light, or something else in the room unless that's your intention.
- Be prepared to go through a lot of images afterwards. I like to make several modifications to the lighting setup and the shutter speed when I do an object shoot. That leaves me with a lot of very similar looking RAW files to look at later.
- Be prepared to post process. For me the toughest situation is working with images with reflections. I use acrylic, which is cheap but picks up dust like you wouldn't believe. No matter how much I dust, I need to clean up the surface afterward I shoot.
- A good tripod is strongly recommended. Although I actually managed to shoot this with my monopod (I don't recommend it).
There's a ton of great information on lighting setups, post processing, and more on youtube, but nothing was more useful to me than prophotolife episode 2.
 You can find product designs based on my vase shots and other object photos in my zazzle store. If you have a product in mind but don't see it, just leave a message on the store wall or product page and maybe I'll design it for you!


This turned out great! I love the lighting, and the subject matter you chose works beautifully with the colors.
ReplyDeleteThanks. Glad you liked it.
ReplyDelete