 If you're comfortable shooting outside at night for extended periods, you may want to try something more ambitious than your usual fare. If you're really patient and have the right equipment, try doing a star streak.
There are a lot of articles on how to to get good star streaks, and different methods available. I'm just going to cover the technique I use, which should be a good start even if you opt for something different.
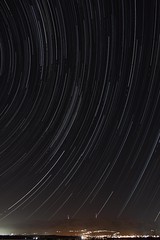
Throughout the night, due to the earth's rotation, the stars will gradually traverse a circle around the celestial pole. If you had the patience and the you could see the stars during the day, you'd have a full circle in 24 hours. Still, in just an hour or two, you can get some impressive results.
Preparation
Unless you feel safe leaving your camera out overnight, be prepared to wait nearby. You can see star movement in as little as 10-15 seconds (depending on proximity to the celestial pole), but to get a good dramatic effect, I recommend at least an hour. That'll get you 15 degrees of arc.
Also:
 You'll need your trusty tripod.
- Make sure your card is empty and the battery in the camera is fully charged. If you have to change either the card or the battery, that'll leave a large gap. Also, you risk bumping the tripod when you remove, then replace the camera.
- Choose your composition. I always include a piece of the ground for a nice contrast.
- Find the hyperfocal distance on your camera, its "infinity". If the moon is out, just focus on the moon. Otherwise you'll need to get a patch of the sky in focus, which can be tricky if you don't have a good viewfinder.
- Get your exposure. Aperture and ISO determine the brightness of each streak, so plan accordingly. Exposure time determines the brightness of the background, as well as the length of each segment of streak.
- Take a test shot and make sure you like it. Adjust if necessary and repeat. Once you're satisfied, remember to delete the test shots.
- Start shooting. You'll need an intervalometer, or a cable release or remote with locking capability (unless you want to hit the shutter more than 100 times in succession). I have a remote with locking capability. I put the shooting mode in low speed continuous, set the exposure for 30 seconds (longest non-bulb exposure available on the 40D), and lock down the shutter. (If you check the photos shown here in large size, you'll see tiny gaps in each streak. That's the time between exposures.)
- Every half hour or so, give the lens a quick swipe with your cleaning brush (right after the shutter closes) to keep dust from building up.
- Check for mist on the lens. If it starts misting over, call it a night.
Processing
Now you should have a very large number of images with tiny commas on them. If you shot RAW, bump up the contrast and sharpness, and adjust the exposure to taste.
Once you have the images you want, or at least the best you can do, it's time to combine them into the final product. If you don't have a fancy processing package, use Photoshop or the GIMP (which I use) to combine each image to its successor.
 Starting with the first 2 images, load them both as layers, and combine them in Lighten Only mode. Merge them together, grab the next image, and so on until you've done them all.
Simple, right ? Ideally, yes. In practice, as with any time you do outdoor night photography, you'll be harassed by planes and helicopters flying through your canvas. Therefore each image needs to be checked for non-star streaks, or you'll wind up with something like the image on the left. Fortunately, with Lighten Only you need only paint over the offending plane trail segment in black.
Good luck.
You can find product designs decorated with star streaks in my zazzle store. If you have a product in mind but don't see it, just leave a message on the store wall or product page and maybe I'll design it for you!


